ubuntu安装配置mysql(Hfish数据库)
ubuntu云服务的其他详细配置见另一个blog环境配置
ubuntu安装配置mysql
安装mysql
安装服务
# 安装服务
sudo apt update
apt install mysql-client-core-8.0     # version 8.0.28-0ubuntu0.20.04.3
sudo apt-get install mysql-server

# 开启服务
service mysql start

# 查询是否开启成功
sudo netstat -tap | grep mysql
sudo apt updateapt install mysql-client-core-8.0 # version 8.0.28-0ubuntu0.20.04.3sudo apt-get install mysql-server开启服务
service mysql start查询是否开启成功
sudo netstat -tap | grep mysql
配置mysql
登陆
mysql -u root修改密码
sudo cat /etc/mysql/debian.cnf用显示的用户密码登陆
ALTER USER 'root'@'localhost' IDENTIFIED WITH mysql_native_password BY '[输入新密码]';
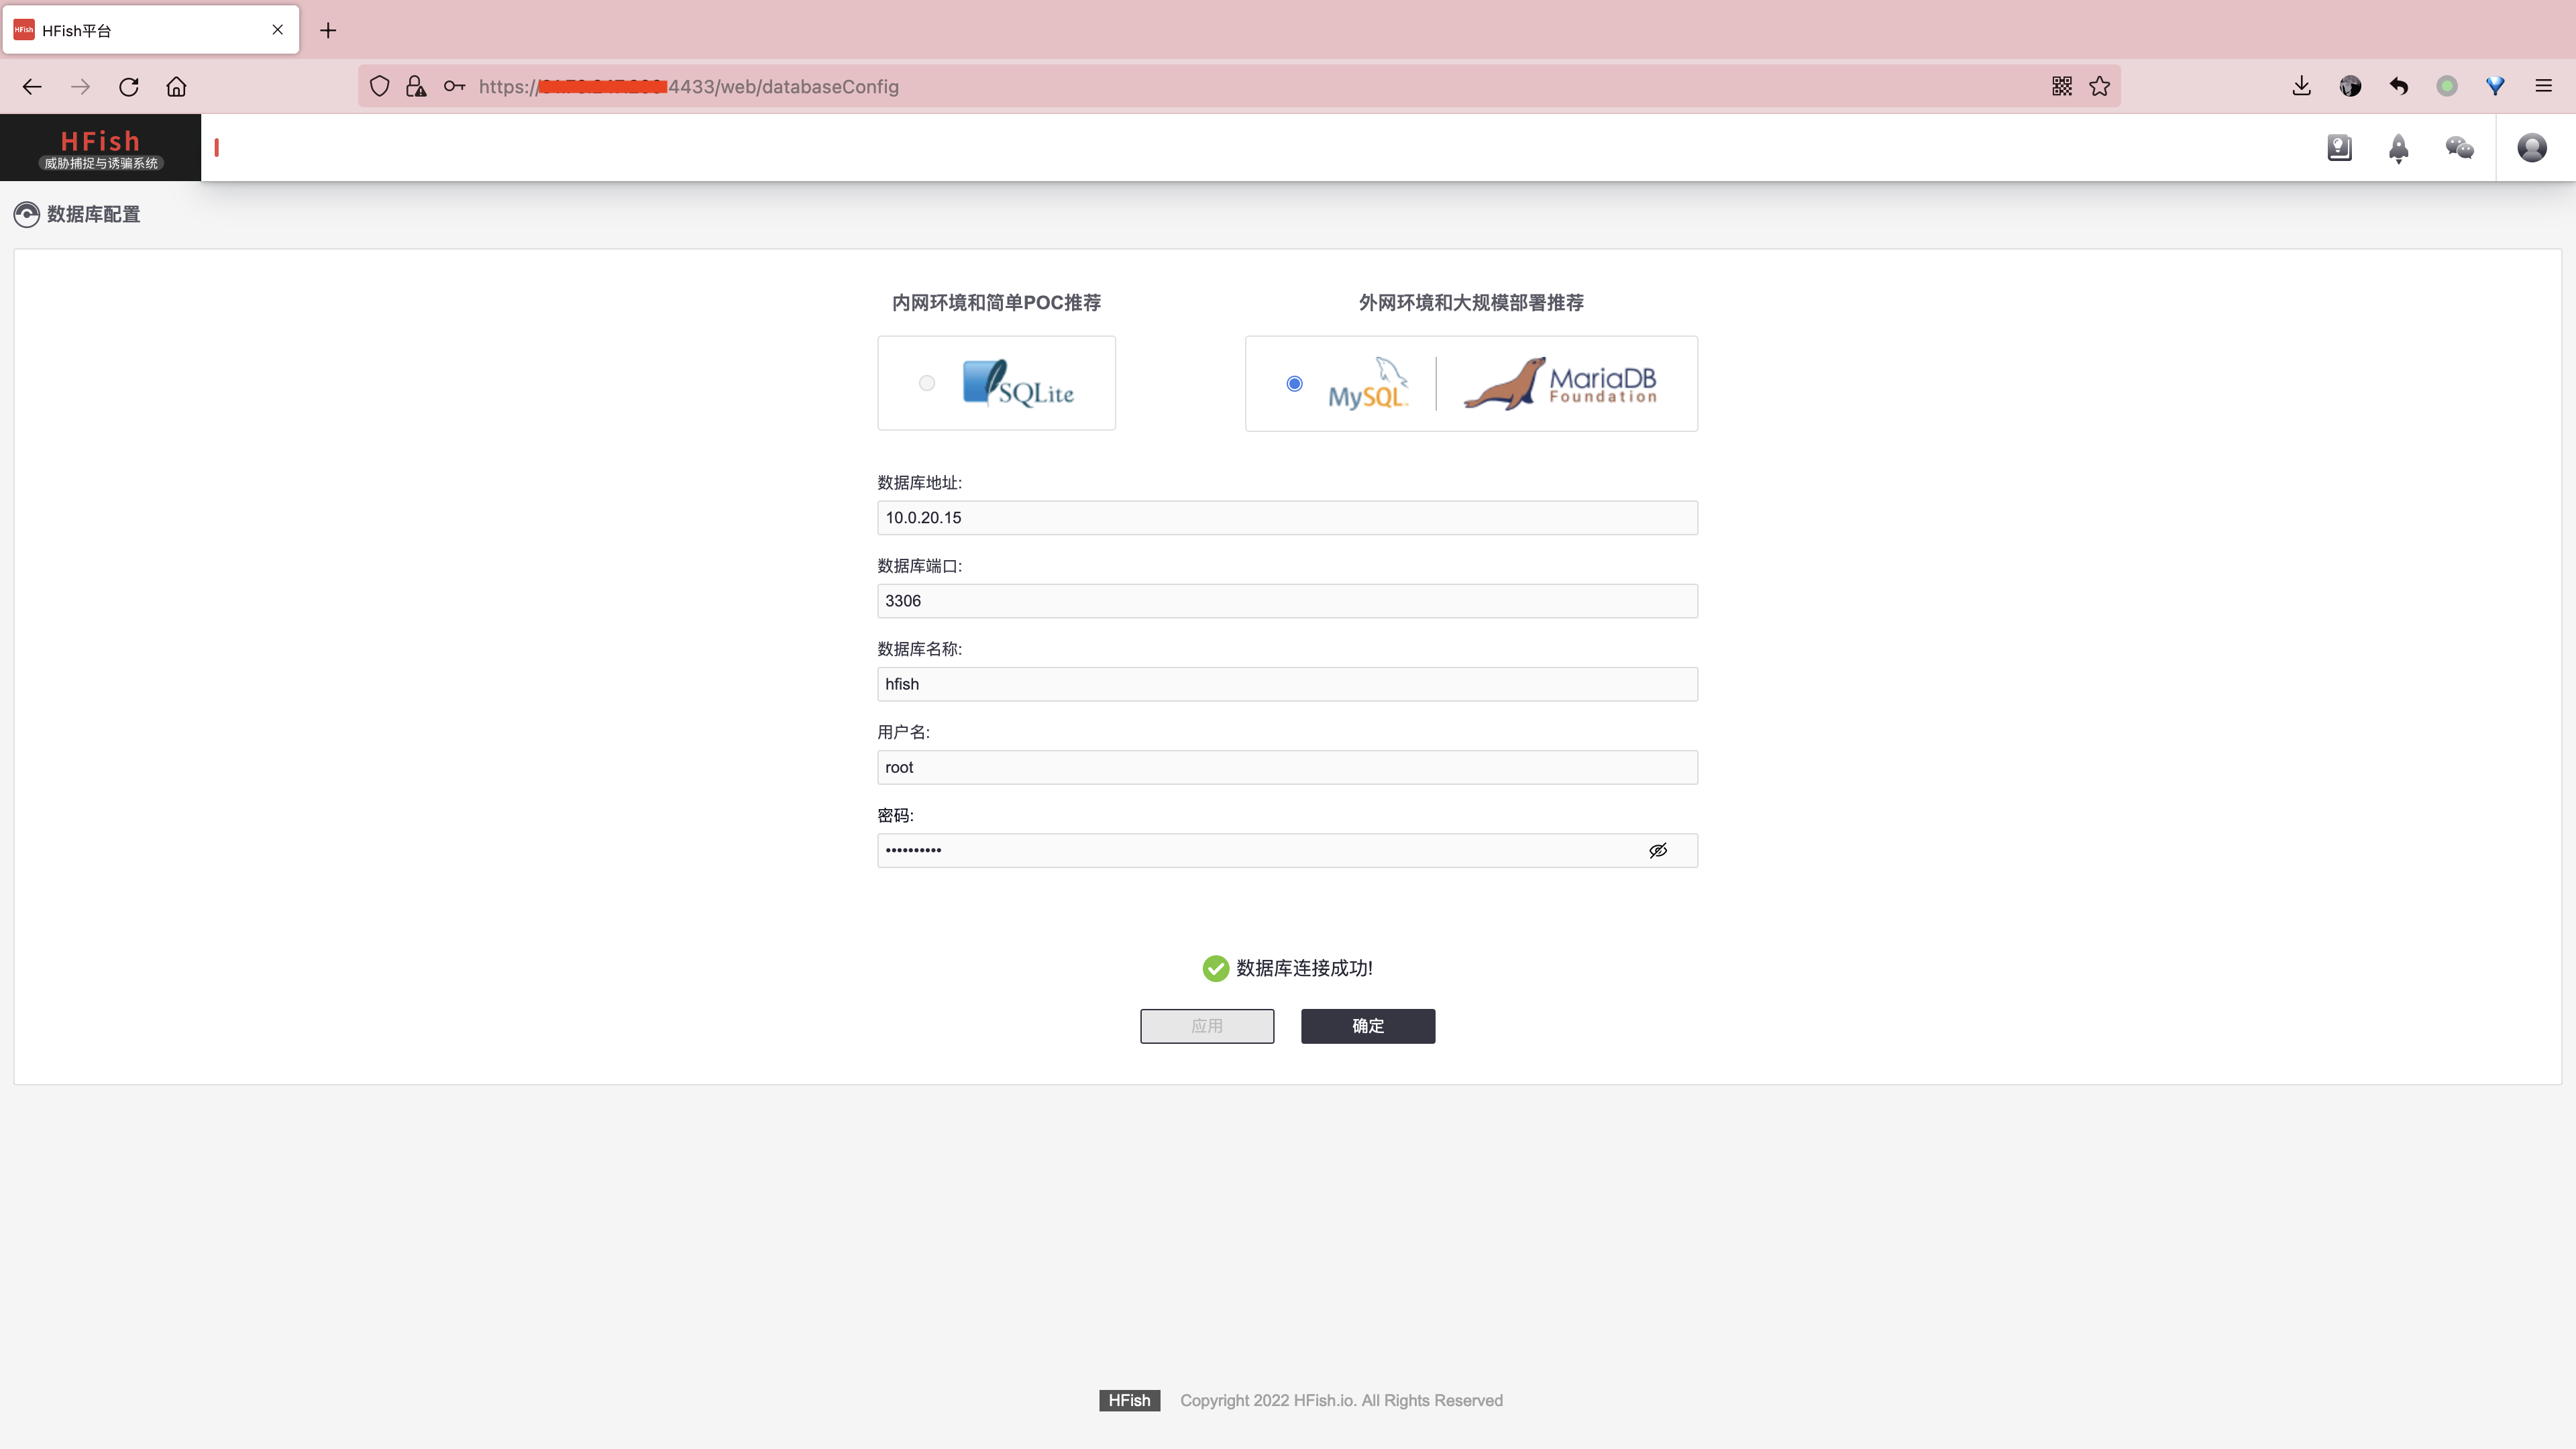
创建蜜罐的Hfish数据库
把创建数据库的mysql脚本上传到云对象存储
-- ----------------------------
--  Table structure for `hfish_info`
-- ----------------------------
DROP TABLE IF EXISTS `hfish_info`;
CREATE TABLE `hfish_info` (
  `id` int(11) NOT NULL AUTO_INCREMENT,
  `type` varchar(20) NOT NULL DEFAULT '',
  `project_name` varchar(20) NOT NULL DEFAULT '',
  `agent` varchar(20) NOT NULL DEFAULT '',
  `ip` varchar(20) NOT NULL DEFAULT '',
  `country` varchar(10) NOT NULL DEFAULT '',
  `region` varchar(10) NOT NULL DEFAULT '',
  `city` varchar(10) NOT NULL,
  `info` text NOT NULL,
  `create_time` datetime NOT NULL,
  PRIMARY KEY (`id`)
) ENGINE=InnoDB AUTO_INCREMENT=1 DEFAULT CHARSET=utf8mb4;
SET FOREIGN_KEY_CHECKS = 1;
-- ----------------------------
--  Table structure for `hfish_colony`
-- ----------------------------
DROP TABLE IF EXISTS `hfish_colony`;
CREATE TABLE `hfish_colony` (
  `id` int(11) NOT NULL AUTO_INCREMENT,
  `agent_name` varchar(20) NOT NULL DEFAULT '',
  `agent_ip` varchar(20) NOT NULL DEFAULT '',
  `web_status` int(2) NOT NULL DEFAULT '0',
  `deep_status` int(2) NOT NULL DEFAULT '0',
  `ssh_status` int(2) NOT NULL DEFAULT '0',
  `redis_status` int(2) NOT NULL DEFAULT '0',
  `mysql_status` int(2) NOT NULL DEFAULT '0',
  `http_status` int(2) NOT NULL DEFAULT '0',
  `telnet_status` int(2) NOT NULL DEFAULT '0',
  `ftp_status` int(2) NOT NULL DEFAULT '0',
  `mem_cache_status` int(2) NOT NULL DEFAULT '0',
  `plug_status` int(2) NOT NULL DEFAULT '0',
  `last_update_time` datetime NOT NULL,
  PRIMARY KEY (`id`),
  UNIQUE KEY `un_agent` (`agent_name`) USING BTREE
) ENGINE=InnoDB AUTO_INCREMENT=1 DEFAULT CHARSET=utf8mb4;
SET FOREIGN_KEY_CHECKS = 1;
-- ----------------------------
--  Table structure for `hfish_setting`
-- ----------------------------
DROP TABLE IF EXISTS `hfish_setting`;
CREATE TABLE `hfish_setting` (
  `id` int(11) NOT NULL AUTO_INCREMENT,
  `type` varchar(50) NOT NULL DEFAULT '',
  `info` varchar(50) NOT NULL DEFAULT '',
  `update_time` datetime NOT NULL,
  `status` int(2) NOT NULL DEFAULT '0',
  `setting_name` varchar(50) NOT NULL DEFAULT '',
  `setting_dis` varchar(50) NOT NULL DEFAULT '',
  PRIMARY KEY (`id`),
  UNIQUE KEY `index_key` (`type`)
) ENGINE=InnoDB AUTO_INCREMENT=5 DEFAULT CHARSET=utf8mb4;
-- ----------------------------
--  Records of `hfish_setting`
-- ----------------------------
BEGIN;
INSERT INTO `hfish_setting` VALUES ('1', 'mail', '', '2019-09-02 20:15:00', '0', 'E-mail 群发', '群发邮件SMTP服务器配置'), ('2', 'alertMail', '', '2019-09-02 18:58:12', '0', 'E-mail 通知', '蜜罐告警会通过邮件告知信息'), ('3', 'webHook', '', '2019-09-03 11:49:00', '0', 'WebHook 通知', '蜜罐告警会请求指定API告知信息'), ('4', 'whiteIp', '', '2019-09-02 20:15:00', '0', 'IP 白名单', '蜜罐上钩会过滤掉白名单IP');
COMMIT;
SET FOREIGN_KEY_CHECKS = 1;
云服务器下载sql脚本
curl -o hfish.sql "https://appendix-1310394682.cos.ap-beijing.myqcloud.com/script/hfish.sql"
创建数据库
create database hfish default charset=utf8;使用该数据库
use hfish导入mysql
source /home/ubuntu/hfish.sql
查看数据库内容
show tables;     #查看表
desc [表名];     # 查看表具体信息,列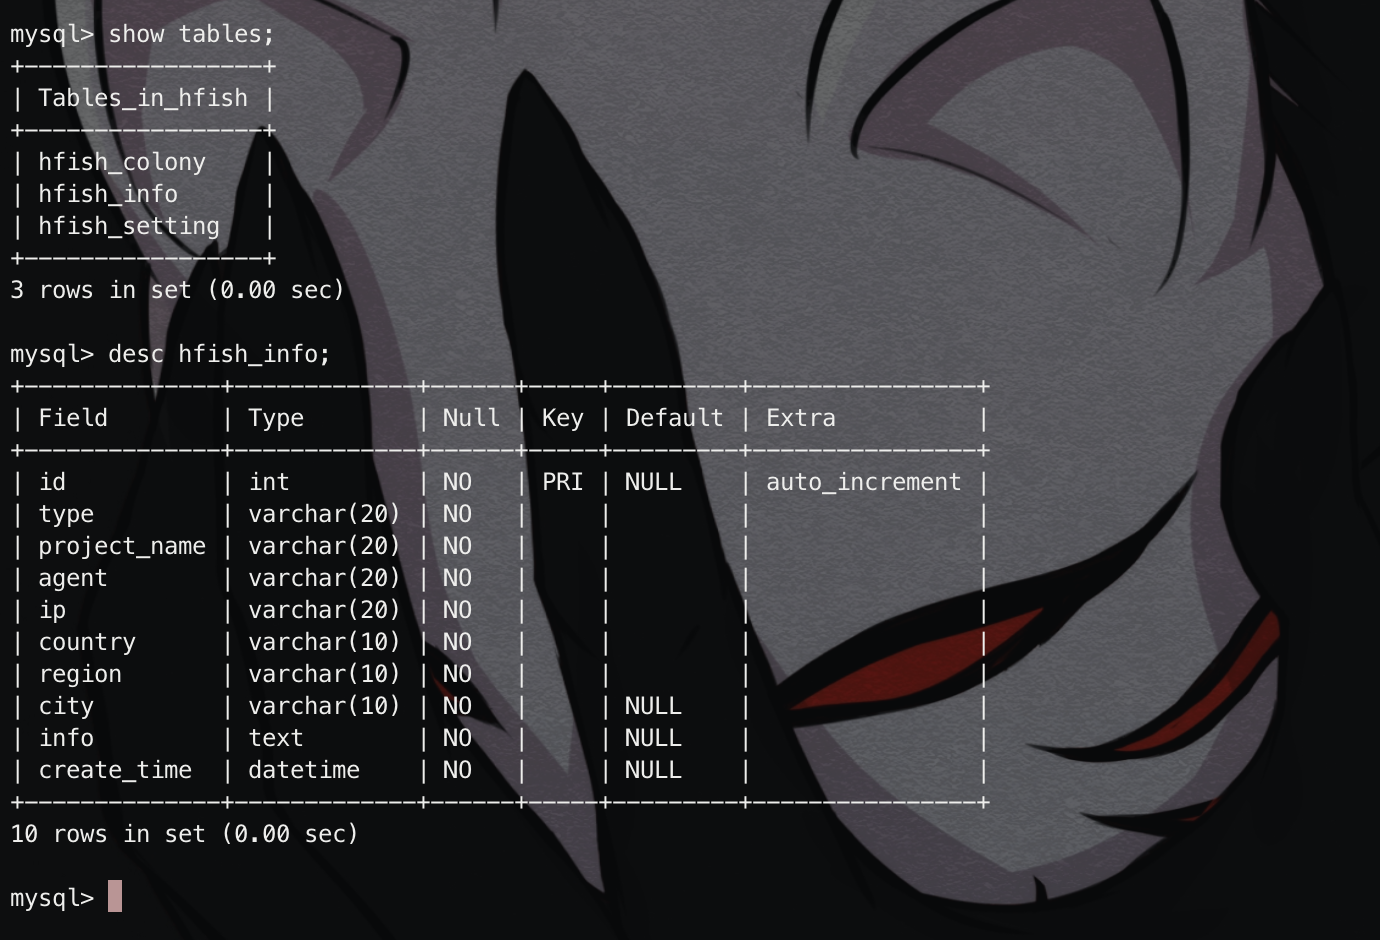
允许外网访问
修改云服务器上mysql配置文件
cd /etc/mysql
vim mysql.cnf
添加这一行
[mysqld]

bind-address = 0.0.0.0
# 要空一行
检查监听端口
netstat -nutlp | grep mysql
设置mysql的权限
进入mysql:
mysql -uroot -p输入密码。
选择mysql数据库:
use mysql;增加允许远程访问的用户或者允许现有用户的远程访问。 给root授予在任意主机(%)访问任意数据库的所有权限。
update user set host='%' where user='root' and host='localhost';退出mysql:
exit重启数据库:
sudo service mysql restart连接成功